Wednesday, March 19, 2008
Background
Ever wanted to roar down the road in an awesome sports car making the right level of noise that really attracts attention? Hasn’t any young schoolboy (or girl?)!
My inspiration photo -
 My desire to do just this possibly started when I learnt to drive at the Killarney track Race in Cape Town while in my final year at Camps Bay High School. The Western Province Motor Racing Club along with BP, sponsored the training of selected children in the art of correct driving methods. While not intended to be race driver training, there were many opportunities where the open track coerced us into drifting through corners at slightly higher speeds than expected of a novice driver! During breaks at these sessions, we would spot the odd race car being tested, or just see a mechanic working on a car in one of the areas close to the pits.
Over the next few years there was always a dream to own a faster car, especially one faster than my mother’s Mini Clubman, although even this little car could perform quite well around the bends between Camps Bay and Sea Point, where all the socials were held! Unfortunately my salary did not allow for the upgrades I would have liked, and then as marriage, homes and ultimately children came along, there was absolutely no way there was spare cash for a car of ultimate dreams. However, in the early 80’s, kit cars were starting to become available, and as they were relatively cheap, they became an option that looked interesting. I did some research into these cars, and each time that they looked promising, the price would go up, or we had other priorities, like overseas travel or another child - no regrets on either of these! So the dream lived on but only as a dream.
Then in 2003, after receiving a small but very grateful bonus from my employer, my wife and I agreed that I should take some of the money for a kit, if she could re-curtain the living room! Now that was a bargain I could not refuse, I created a set of principles which would govern the build, and a list of criteria that I would use to evaluate potential suppliers.
Principles & Criteria
The principles were as follows :-
· Car building would not take precedence over all other expenses, ie I had to have spare cash and not use the daily housekeeping money!
· I would build the car over many months (or years) and not have a fixed date of completion. (ie I would spend time with the family too!)
· I would build the car as a showpiece, and not as a direct replica.
· I would wait to purchase the parts that I would ultimately want on a show car, and not just rush to get it on the road.
The supplier evaluation criteria included the following :-
· Preferably Cape Town based.
· At least South African based.
· The company should be solid and have many cars on the road.
· The car should be of sound and safe construction.
· The company must offer assistance to assemble the kit.
· The kit must be available in phases.
· Parts for the kit must be easily available in SA.
Researching
Now that these conditions were laid out, I immediately started exploring kit options. The only obvious ones in Cape Town were Dart Engineering (Les Hayden) and Shamrock (Dirk Maree). I also established e-mail contact with Johan at Venom Cars in Johannesburg. I started with Les, and after one or two meetings and viewing the details and pictures of the Venom car, decided that the awesome Hayden car was going to be my best option. As a last check before doing the deal, I decided to take my wife out to view a car. On arrival at the factory I noticed “To Let” signs on the door. I was a bit annoyed that I had not phoned ahead as I now assumed that Les had moved, and I did not know to where. Just then, the neighboring café owner called to me that a team of liquidators had been to the factory and that Dart Engineering was no more. You can imagine how annoyed I now was, but at the same time how relieved I was that I had not signed up for a car and especially that I had not paid a deposit.
So it was back to the drawing board. I then did some more research on the web and came up with The SA Cobra Club, who recommended a local chap who was starting to build kits in Table View. I contacted him and went out to view his kit. Unfortunately he was at a very early stage of development, and I was not too sure of the potential future support I could expect. This was a pity, as I believe that the kit he is building is very close to the original design with a 4” tubular frame.
The next option was Shamrock. I met with Dirk who certainly impressed me with his knowledge of the car, and I was also comfortable that the company had been building Cobras since the early 80’s (based on the original design by Les Hayden), and that Dirk and his partner had been owners for many years. Although not much had been changed on the original design, I was comfortable that the current design was tried and tested, and very solid – possibly too heavy, but then with a light body and powerful engine, weight was not going to be a problem.
The first purchase
So on the 23rd August 2004, I finally bit the bullet and bought most of the phase one components. This would enable me to assemble virtually the complete rolling chassis. After delivery of the chassis, I constructed a trolley frame which has large castor wheels at each corner. This enables me to move the chassis in any direction, very important when building in a confined space, such as my single garage. After many trips to take pictures of partly completed cars at Shamrock, and with lots of advice from their floor manager, Eli, I gradually built up the phase one parts. These are mostly Jaguar XJ6 based, such as the diff, brakes, wishbones, etc. The kit went together reasonably well and most parts fitted together like a Mecano set, requiring very few modifications.
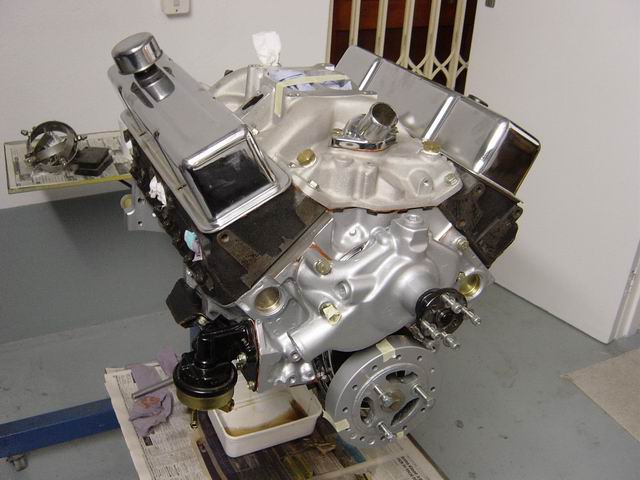
I was then starting to think about the engine, and after meeting Jean Fourie from Auto Futura, builders of superb GT40's in Cape Town, he offered to rebuild an engine for me. The best part of all was that I would be involved in the rebuild, and would learn a huge amount about engines from Jean as we progressed. The engine is a 1972 Chevy 350 V8, and came with some extra parts such as an Edelbrock Performer intake manifold, Mallory distributor, and a set of modified ported heads. As there was no torque converter or flexplate, I decided to purchase these and after hunting around for second hand parts, managed to find a GM Turbo 350 automatic gearbox with a converter, but had to buy a new flexplate.
The bad news!
Just after committing to Jean to build the engine, I became aware that there were troubles within Shamrock, and after some debate with them, I decided to buy all the components that were Shamrock specific. This included the body, bonnet doors, boot, dash, centre subframe, engine fan cowling, and one or two other small parts. This was a major financial drain on me, which subsequently stopped the build of anything that required money. Fortunately, I had the money for the engine, so at least that could go ahead, and progress in this space was slow as Jean moved his factory, so cash flow was assisted! Shamrock was taken over, renamed, and then went into liquidation, so although sad, I was again relieved that I bought when I did.
November & December 2005
 While waiting for the engine to be completed, I decided to begin the lining of the engine bay. I copied the idea from Jean who has lined his bay with 1.2mm aluminum backed with insulating 6mm foam rubber. He did warn me that this task would take time, and how right he was! But it has been fun cutting, bending shaping, grinding each piece which was eventually removed to be powder coated before being re-installed.
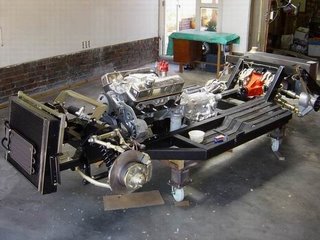
The engine was completed, and after a successful oil pressure test, was delivered by Jean and his team and installed in the car. The chassis was now really starting to look like a car!
January 2006
I took a few days leave in January, which meant some quality building time! I managed to fit the radiator cooling fans and their shroud, but had to take it off again as the radiator heat switch thread was not the correct size. This was subsequently re-tapped and the switch fitted. Eli helped me to fit the gearbox, which took longer than expected as the rubber mounting bracket (made in India!) had a stripped mounting bolt, as were one of the holes on the aluminum gearbox. After re-tapping all holes, we mounted the gearbox and the torque converter. On trying various yokes on the gearbox, we realised that the internal seal had not been reamed out enough, so that had to be taken back to the company who overhauled the box. You would think that they check this before delivery! Next I mounted a transmission cooler on the front of the radiator, and piped that up to the box with bundi tubing and flexible joints. The fuel line was also installed and we could finally measure the prop shaft length and have it made up. This was completed in record time (2 days) and so we could fit it as well, but in doing so, discovered that the diff oil seal was leaking. So it was off to Jaguar for a replacement which also took two days to be delivered, during which time we found that the retaining washer was of the wrong size! Frustration after frustration. So while we waited for a new part, we worked on the body, and completed all the body holes and squared up all the main lines. The body was temporarily mounted after ensuring that it was perfectly lined up on the chassis.
February 2006
I removed the aluminum engine lining and had it powder coated in a white aluminum colour - looks great. The coating is very forgiving, meaning that all the little scratches are completely covered. I re-mounted the coil-over shocks which had collars added to their mountings, re-fitted the fans, and then sanded the belly and engine bay in preparation for painting. What a messy and itchy process! After spending hours cleaning the dust, I painted the not to be plated engine walls with smooth finish Hamerrite black. After the first coat, I decided that I didn’t like the finish of the black paint as it really shows all the unevenness in the fiberglass, even though most of it will be out of sight.
March 2006
The engine bay was re-painted with Durabak stone chip paint, which due to the tiny bits of rubber in the paint, it covers all the fiberglass imperfections, and looks much better. At the same time I painted all the under car parts with Durabak. It was then the long task of re-installing all the engine lining, using close to 300 rivets, each being sealed with a blob of silicone sealer. It took ages, but worth the effort.
April 2006
During this month we fitted the body permanently onto the chassis after careful alignment. I also added the accelerator & brake pedals, brake booster and master cylinder, and some of the brake bundi tubing. It was now that I decided to install a proportional valve on the front brake lines. This led to much debate as to which line it should be, but eventually consensus was the front line.

May 2006
May saw a bit more activity – with the steering column and coupling being bought, and all the radiator pipes and tubes being installed, along with the polished header tank. All the plumbing stuff was now completed. We also finished connecting up the brake pipes and the proportional valve.
June 2006
This was a much slower month, with Eli starting to build the headers. This takes quite a bit of time, especially as he has to avoid damaging the powder coated lining!
July 2006
Things picked up again with us adding the stainless steel battery tray, the accelerator cable and kick down cables, mounting the steering column, and fitting the doors. This step takes a while as you have to trim the fiberglass one bit at a time, otherwise the door shut lines will be uneven and will require build up again. I also installed the wiper motor and started cutting the dash insert around the steering column. I also ordered the gauges, windscreen, coil, igniter kit, and door locks – big expense, but will keep me busy in the next month!
August 2006
We continued doing the bonnet and door cutlines, which could only be finalised once the body was off the trolley and onto wheels. It is amazing how much the chassis flexes, and so now we can finish the first pass body shaping. Unfortunately there was little other time to work this month, so not much else was completed.
September 2006
I undertook a business trip to the USA and UK, and managed to purchase all of the lights, switches, mirrors, wiper blades, brake reservoir tank, badges and handles and locks. Quite a bit more to get on with, and all lights are now mounted.
October 2006
Most of this month was taken up with a two week holiday to Bangkok, Phuket and Singapore. The only negative about this great holiday, was that the only car parts I could see were for a Tuk Tuk! On returning, we attempted to mount the boot with the hinges I bought overseas. Unfortunately they packed Triumph hinges in the Cobra box, so these have to go back. This meant having to reseal the holes with fibreglass and starting over when I can get replacements. We mounted the door locks and handles, so the doors are now finished and work well. On attempting to fit the windscreen into its frame, the glass cracked - our worst nightmare, and after the hassle with the boot, we called it quits and will wait for next month to continue. I have also researched the rims and tyres I will use, as I feel it is a good idea to fit these and then do the final body prep and shaping before spraying. There is quite a bit of debate on the rims, but I have decided on 17" Halibrand lookalikes with real knock-ons. The tyres are 235/45 R17 on the front and 315/35 R17 at the rear. Serious rubber!!!!
November 2006
While waiting for the rim supplier to eventually give me the specs on offsets and on the price of shipping to Cape Town, I proceeded with the final body fitments, including th e new windscreen. We added the bonnet locks and the gas struts and the boot lock and its hook in the boot itself. In final preparation of the body sanding down, I refitted the sidepipes, which meant having to re-fit the headers temporarily again. I have also cut the holes in the dash for the instruments, this after many mockups on PowerPoint, which was very useful for laying everything out to scale and being able to print a colour copy which I stuck into the car. This way you get to see everything exactly where and how it will look when complete. At least it is really looking like a real car now!
December 2006

A really frustrating month as I wait for the tyres and rims to be delivered. These finally arrived and on seeing them, all frustration disappeared! They are awesome to say the least. I had the tyres fitted to the rims and could not wait to try them on the car, only to be disappointed that the rim supplier had sent metric mounting pins for the spinner adapters for the 1/2" UNF studs on the Jag hubs, and they were now closed for Christmas. So now I must wait for mid Jan to get on with the next step - shaping the body to cater for the monster rear 315's! I received the petrol cap and positioned it where it is supposed to go, but have decided to turn it around so that a filler hose is not obstructed by the flipped up cap. This necessitates raising it slightly to miss the body when open. Nothing more will get done before mid Jan, so have a great Christmas and let's hope I get some parts from the family!
January 2007
I did receive a great hardcover coffee table book on the Cobra history from the family - no parts, but great reading! Also eventually got the right wheel studs from the rim supplier and eagerly fitted the rear wheels and then tried the front which don't fit! More frustration. The supplier cannot understand this, yet when I asked other folk fitting them, they all have to modify the hubs! So I decided to ask Jean Fourie to assist again, and loaded up the car on a flat bed and took it off to Tokai.
 That was all for January
February 2007
 The car was now rubbed down and all the impefections (many) in the body shell were heated up, popped and filled before being rubbed down. Jean also created spacers for the front hubs so that the adapters fit without having to be pressed on and potentially never coming off. He also modified the side pipes to improve their overall height, as these were hanging too low, and would catch on the slightest speedbump. The large Cobra air filter was modified and lowered so that it does not touch on the bonnet.
March 2007
 The prep work took longer than expected, but all was eventually completed, along with the adjustments to the angle of the shocks, boot and bonnet rubbers, petrol cap spacer and front wheel arches.
April 2007
I collected the car and brought it back to my garage. It is amazing how much you miss it when it's not there! I would have taken it straight for spraying, but I felt I must complete all the drilling bits while it was unpainted. (Truth is I didn't have enough cash!) I ordered the two roll bars which will fit straight up (ie vertically vs angled) and into the boot, as against to them behind the seats. I also ordered the anti roll and sway bars which only come available when someone wrecks an Izuzu bakkie! Now you know why there is no more cash this month.
May and June 2007
May saw me collecting the rollbars and creating the bracket inside the boot to accommodate them. This entailed drilling big holes through the body which took a while to pluck up the courage to do, even though I could still have repaired a mistake in the unpainted body. All went well except that I discovered that the boot is actually off centre, so the bars, which will follow the centre line and stripes, are also slightly off centre. I hope nobody comes to view the car with a tape measure! I also got the stainless steel plates for my dash which will hold all the warning lights and the radio and switches. These were sent off for polishing with the roll bars. In June, we finally managed to find two sway bars and started to fit them, which due to the adjustments on my rear shocks, was slightly different to the way Shamrock fitted them. Eli constructed templates of special mounting brackets and took them off for fabricating at home.
July 2007
We concluded the sway bar fitting with the brackets being TIG welded onto the chassis and the new brackets fitted to the rear hubs. I also completed the dash plates which were polished last month. I mounted all the warning lights, switches and the starter button. The dash is now ready for upholstery. The handbrake bracket which I constructed last month was plated and is now mounted, on the passenger side of the tunnel. This allows a small space to rest your arm without being poked by the lever. Jean's team returned to touch up some small issues with the body preparation and it is now ready for painting. I had some quotes for this task and must admit to being surprised at the high costs, but then again, I want it to look good so I had to go to the best painters. The diff was filled with lube and a small bracket to hold the fuel line at the rear was fitted.
August 2007
Nothing happened this month other than the very exciting event of taking the car for spray painting. A little dissapointing when they advised that the car still needed quite a bit of rubbing down, and that it would take almost two months to complete. It looks like this car will never get on the road!
September 2007
I was on leave in the UK and watched the Boks play (or was that THUMP?) England in the World Cup, oh, and forced to visit a few UK parts suppliers. I went to Merlin to buy seat belts, exterior mirrors, and a radiator cap, and visited Mota Lita and bought a steering wheel. In my last week I caught a train out to Harlow to visit DJ Sportscars, commonly known as Dax, and spent some time watching them fabricate their Cobra lookalike. Furtunately for my wallet and my suitcase weight, they didn't have any parts I could use.
October 2007

After a slow start while I was away, the spray painters continued to prep the body for spraying by rubbing down the car again, and then applying the first coat of primer. This highlighted all the imperfections which were filled (see right) and sanded down yet again (see below). This was then sprayed again with undercoat before being finally rubbed down. Slow process, but very important if it is to look good later on. They also produced a sample of th e paint colour on an off-cut piece of metal, which meant I could confirm the colour and the type of white before actually spraying the car itself.

November 2007

After lots of frustration of trying to line up the stripes around the various odd shapped and misaligned body, spraying took place on Friday 9th. Two undercoats, two blue and two clear. Great excitement. It now stood for a week before polishin g.
g.
I then hired the trailer again and moved it over to the upholsterer (Peter Crowley) to do the leather dash, seats, carpets, boot and door panels. This took about two weeks, and as they are located in town, I could pop in most days to check out progress, which was fast . They did a great job .


Once complete, I hired another trailer to bring it home. This was not very successful as the trailer was too short, or more importantly, the nose could not fit over the trailer frame and hence I had to abandon the move - very disappointing! Two days later I managed to hire the original trailer and we were home safe.
December 2007
After fitting the lights back on the car, the auto electrician arrived and started to fit the loom. I am really glad he had done this before as there are so many wires, I just don't know where they all go!
After a few days the wiring was completed in the car and the dash was also done. It was now time to start re-fitting everything into the holes that were either filled in or made much smaller. Not fun drilling and filing out holes in newly painted body work.
The car was now starting to look like my inspiration photo right at the top of this blog. I bought the battery, hooters and lots of stainless steel bolts and nuts for refitting all removed parts.
On Thursday the 20th, the hooter blasted, lights lit up, indicators flashed, gauges lit up, the clock ticked, the fans blew air, and the engine could be turned - MASSIVE excitement! Next was a fruitful Saturday refitting the headers, exhausts, carb, various senders and we connected the plugs and electronic ignition in the distributor. On the last day of 2007, Eli and I worked, but unfortunately we did not get around to starting the car. We did however connect the gear lever cable to the gearbox, greased all the bearings, and then started to bleed the brakes, only to discover the master cylinder for the rear brakes has seized! So that had to come off with brake fluid going everywhere, but mostly in a controlled fashion. We then fitted the rear 315's, did the speedo sender bracket to pick up the revolutions from the propshaft bolts, and ended the day (year!) by fitting the fuel tank sender. Starting would now have to wait for some time in 2008.
January 2008
On my last day of leave, the master cylinder arrived back, only for us to discover that for some reason they had sandblasted all the coating off it and not re-coated it! I could have painted it, but we still would not have been able to fit it, so back it went for coating. This of course meant that we could not bleed the brakes, nor re-fit the front wheels, and naturally not start the beast! We did get to fitting the filler cap and linking pipes, replacing the windscreen, and fitted the Moto-Lita steering wheel and rear view mirror. I also plucked up the courage to drill the holes for the badges, so now I know it is a 350 Shamrock Cobra! The master cylinder was returned and refitted, and although much better, was still not right. It was strong enough to allow us to bleed the brakes and prepare for the FIRST START! Tuesday 22nd Jan 2008, Jean, Eli, Yusuf and I filled the fuel tank, the radiator and the gearbox with the necessary fluids. To our relief, nothing poured out the bottom! We then jacked up the rear, checked oil pressure with the coil disconnected, and then at 6:38pm, we turned the key for the first start. It kicked into life almost immediately!
We then proceded to prime the gearbox and unfortunately discovered a serious gearbox leak out of a hole on the side of the box. Furtunately this is just a pressure testing vent which should have a plug in it, so after sourcing and fitting the plug a few days later, I could fill the gearbox and prime the box. Dave Geddes then popped over and we set the carb - and took it out onto the road for its first drive - awesome feeling!
 February 2008
The seats were bolted down and I temporarilly fitted the seat belts. They were temporary as they are 4 point harnesses and although I used the main lower mounting points into the chassis, the position of the top ones was only to be decided on later. Jean helped me adjust the shocks up a bit, but they could go some more. The roll bar cover plates were laser cut and had studs welded on their undersides ready for polishing and mounting.
The next big event was taking the car to Stikland for clearance and registering. The process is laborious, but has to be done in sequence. If anyone has to go through this, give me a call! The first phase is the Police checking that the car is "built up" and that the engine is not stolen. You then get a chassis number which is then stamped (smashed?) onto the chassis, followed by going back to the Police for stamping of another number on the chassis. Then a weight certificate, which all gets handed in at the municipality who send it away for a VIN number. Fortunately eNatis was working for once, and within 3 days I received a call to collect my papers. This I did in the following week, along with another temporary licence.
March 2008
On the Saturday of that week, I took the car to Table View AVTS and flew through the roadworthy. Now that I had a roadworthy, I got a 21 day temporary licence which meant I could go on my first breakfast run on the Sunday, which was a drive over Ou Kaapse Weg, Chappies, Hout Bay, Constantia Nek, and back home - awesome feeling! Then on the Tuesday I went back to Stikland, where they checked the number on the RPC but advised me the computers were off-line and I would have to come back again the next day! Just when I was so close, and I had thought the two steps forward, one backwards routine, was behind me! But the next day I eventually got my documents and did the registration bit at the traffic department, so now she was totally legal! COBRA08-WP lives!
Since April 2008
Once I started driving her around, I soon had to have the wheel allignment done, dyno tuning and final touch-up to the paintwork. I also had a softtop fitted and then a Tourneau cover using the same Tenax fasteners on the body.
Thats all for construction! It is now just great fun driving it.
Hope you enjoyed reading my story.
Peter Versfeld
==============================================================
Counter (Since January 2008)
Ever wanted to roar down the road in an awesome sports car making the right level of noise that really attracts attention? Hasn’t any young schoolboy (or girl?)!
My inspiration photo -
My desire to do just this possibly started when I learnt to drive at the Killarney track Race in Cape Town while in my final year at Camps Bay High School. The Western Province Motor Racing Club along with BP, sponsored the training of selected children in the art of correct driving methods. While not intended to be race driver training, there were many opportunities where the open track coerced us into drifting through corners at slightly higher speeds than expected of a novice driver! During breaks at these sessions, we would spot the odd race car being tested, or just see a mechanic working on a car in one of the areas close to the pits.Over the next few years there was always a dream to own a faster car, especially one faster than my mother’s Mini Clubman, although even this little car could perform quite well around the bends between Camps Bay and Sea Point, where all the socials were held! Unfortunately my salary did not allow for the upgrades I would have liked, and then as marriage, homes and ultimately children came along, there was absolutely no way there was spare cash for a car of ultimate dreams. However, in the early 80’s, kit cars were starting to become available, and as they were relatively cheap, they became an option that looked interesting. I did some research into these cars, and each time that they looked promising, the price would go up, or we had other priorities, like overseas travel or another child - no regrets on either of these! So the dream lived on but only as a dream.
Then in 2003, after receiving a small but very grateful bonus from my employer, my wife and I agreed that I should take some of the money for a kit, if she could re-curtain the living room! Now that was a bargain I could not refuse, I created a set of principles which would govern the build, and a list of criteria that I would use to evaluate potential suppliers.
Principles & Criteria
The principles were as follows :-
· Car building would not take precedence over all other expenses, ie I had to have spare cash and not use the daily housekeeping money!
· I would build the car over many months (or years) and not have a fixed date of completion. (ie I would spend time with the family too!)
· I would build the car as a showpiece, and not as a direct replica.
· I would wait to purchase the parts that I would ultimately want on a show car, and not just rush to get it on the road.
The supplier evaluation criteria included the following :-
· Preferably Cape Town based.
· At least South African based.
· The company should be solid and have many cars on the road.
· The car should be of sound and safe construction.
· The company must offer assistance to assemble the kit.
· The kit must be available in phases.
· Parts for the kit must be easily available in SA.
Researching
Now that these conditions were laid out, I immediately started exploring kit options. The only obvious ones in Cape Town were Dart Engineering (Les Hayden) and Shamrock (Dirk Maree). I also established e-mail contact with Johan at Venom Cars in Johannesburg. I started with Les, and after one or two meetings and viewing the details and pictures of the Venom car, decided that the awesome Hayden car was going to be my best option. As a last check before doing the deal, I decided to take my wife out to view a car. On arrival at the factory I noticed “To Let” signs on the door. I was a bit annoyed that I had not phoned ahead as I now assumed that Les had moved, and I did not know to where. Just then, the neighboring café owner called to me that a team of liquidators had been to the factory and that Dart Engineering was no more. You can imagine how annoyed I now was, but at the same time how relieved I was that I had not signed up for a car and especially that I had not paid a deposit.
So it was back to the drawing board. I then did some more research on the web and came up with The SA Cobra Club, who recommended a local chap who was starting to build kits in Table View. I contacted him and went out to view his kit. Unfortunately he was at a very early stage of development, and I was not too sure of the potential future support I could expect. This was a pity, as I believe that the kit he is building is very close to the original design with a 4” tubular frame.
The next option was Shamrock. I met with Dirk who certainly impressed me with his knowledge of the car, and I was also comfortable that the company had been building Cobras since the early 80’s (based on the original design by Les Hayden), and that Dirk and his partner had been owners for many years. Although not much had been changed on the original design, I was comfortable that the current design was tried and tested, and very solid – possibly too heavy, but then with a light body and powerful engine, weight was not going to be a problem.
The first purchase

So on the 23rd August 2004, I finally bit the bullet and bought most of the phase one components. This would enable me to assemble virtually the complete rolling chassis. After delivery of the chassis, I constructed a trolley frame which has large castor wheels at each corner. This enables me to move the chassis in any direction, very important when building in a confined space, such as my single garage. After many trips to take pictures of partly completed cars at Shamrock, and with lots of advice from their floor manager, Eli, I gradually built up the phase one parts. These are mostly Jaguar XJ6 based, such as the diff, brakes, wishbones, etc. The kit went together reasonably well and most parts fitted together like a Mecano set, requiring very few modifications.
I was then starting to think about the engine, and after meeting Jean Fourie from Auto Futura, builders of superb GT40's in Cape Town, he offered to rebuild an engine for me. The best part of all was that I would be involved in the rebuild, and would learn a huge amount about engines from Jean as we progressed. The engine is a 1972 Chevy 350 V8, and came with some extra parts such as an Edelbrock Performer intake manifold, Mallory distributor, and a set of modified ported heads. As there was no torque converter or flexplate, I decided to purchase these and after hunting around for second hand parts, managed to find a GM Turbo 350 automatic gearbox with a converter, but had to buy a new flexplate.
The bad news!
Just after committing to Jean to build the engine, I became aware that there were troubles within Shamrock, and after some debate with them, I decided to buy all the components that were Shamrock specific. This included the body, bonnet doors, boot, dash, centre subframe, engine fan cowling, and one or two other small parts. This was a major financial drain on me, which subsequently stopped the build of anything that required money. Fortunately, I had the money for the engine, so at least that could go ahead, and progress in this space was slow as Jean moved his factory, so cash flow was assisted! Shamrock was taken over, renamed, and then went into liquidation, so although sad, I was again relieved that I bought when I did.
November & December 2005
 While waiting for the engine to be completed, I decided to begin the lining of the engine bay. I copied the idea from Jean who has lined his bay with 1.2mm aluminum backed with insulating 6mm foam rubber. He did warn me that this task would take time, and how right he was! But it has been fun cutting, bending shaping, grinding each piece which was eventually removed to be powder coated before being re-installed.
The engine was completed, and after a successful oil pressure test, was delivered by Jean and his team and installed in the car. The chassis was now really starting to look like a car!
January 2006
I took a few days leave in January, which meant some quality building time! I managed to fit the radiator cooling fans and their shroud, but had to take it off again as the radiator heat switch thread was not the correct size. This was subsequently re-tapped and the switch fitted. Eli helped me to fit the gearbox, which took longer than expected as the rubber mounting bracket (made in India!) had a stripped mounting bolt, as were one of the holes on the aluminum gearbox. After re-tapping all holes, we mounted the gearbox and the torque converter. On trying various yokes on the gearbox, we realised that the internal seal had not been reamed out enough, so that had to be taken back to the company who overhauled the box. You would think that they check this before delivery! Next I mounted a transmission cooler on the front of the radiator, and piped that up to the box with bundi tubing and flexible joints. The fuel line was also installed and we could finally measure the prop shaft length and have it made up. This was completed in record time (2 days) and so we could fit it as well, but in doing so, discovered that the diff oil seal was leaking. So it was off to Jaguar for a replacement which also took two days to be delivered, during which time we found that the retaining washer was of the wrong size! Frustration after frustration. So while we waited for a new part, we worked on the body, and completed all the body holes and squared up all the main lines. The body was temporarily mounted after ensuring that it was perfectly lined up on the chassis.
February 2006
I removed the aluminum engine lining and had it powder coated in a white aluminum colour - looks great. The coating is very forgiving, meaning that all the little scratches are completely covered. I re-mounted the coil-over shocks which had collars added to their mountings, re-fitted the fans, and then sanded the belly and engine bay in preparation for painting. What a messy and itchy process! After spending hours cleaning the dust, I painted the not to be plated engine walls with smooth finish Hamerrite black. After the first coat, I decided that I didn’t like the finish of the black paint as it really shows all the unevenness in the fiberglass, even though most of it will be out of sight.
March 2006
The engine bay was re-painted with Durabak stone chip paint, which due to the tiny bits of rubber in the paint, it covers all the fiberglass imperfections, and looks much better. At the same time I painted all the under car parts with Durabak. It was then the long task of re-installing all the engine lining, using close to 300 rivets, each being sealed with a blob of silicone sealer. It took ages, but worth the effort.
April 2006
During this month we fitted the body permanently onto the chassis after careful alignment. I also added the accelerator & brake pedals, brake booster and master cylinder, and some of the brake bundi tubing. It was now that I decided to install a proportional valve on the front brake lines. This led to much debate as to which line it should be, but eventually consensus was the front line.

May 2006
May saw a bit more activity – with the steering column and coupling being bought, and all the radiator pipes and tubes being installed, along with the polished header tank. All the plumbing stuff was now completed. We also finished connecting up the brake pipes and the proportional valve.
June 2006
This was a much slower month, with Eli starting to build the headers. This takes quite a bit of time, especially as he has to avoid damaging the powder coated lining!
July 2006
Things picked up again with us adding the stainless steel battery tray, the accelerator cable and kick down cables, mounting the steering column, and fitting the doors. This step takes a while as you have to trim the fiberglass one bit at a time, otherwise the door shut lines will be uneven and will require build up again. I also installed the wiper motor and started cutting the dash insert around the steering column. I also ordered the gauges, windscreen, coil, igniter kit, and door locks – big expense, but will keep me busy in the next month!
August 2006
We continued doing the bonnet and door cutlines, which could only be finalised once the body was off the trolley and onto wheels. It is amazing how much the chassis flexes, and so now we can finish the first pass body shaping. Unfortunately there was little other time to work this month, so not much else was completed.
September 2006
I undertook a business trip to the USA and UK, and managed to purchase all of the lights, switches, mirrors, wiper blades, brake reservoir tank, badges and handles and locks. Quite a bit more to get on with, and all lights are now mounted.
October 2006
Most of this month was taken up with a two week holiday to Bangkok, Phuket and Singapore. The only negative about this great holiday, was that the only car parts I could see were for a Tuk Tuk! On returning, we attempted to mount the boot with the hinges I bought overseas. Unfortunately they packed Triumph hinges in the Cobra box, so these have to go back. This meant having to reseal the holes with fibreglass and starting over when I can get replacements. We mounted the door locks and handles, so the doors are now finished and work well. On attempting to fit the windscreen into its frame, the glass cracked - our worst nightmare, and after the hassle with the boot, we called it quits and will wait for next month to continue. I have also researched the rims and tyres I will use, as I feel it is a good idea to fit these and then do the final body prep and shaping before spraying. There is quite a bit of debate on the rims, but I have decided on 17" Halibrand lookalikes with real knock-ons. The tyres are 235/45 R17 on the front and 315/35 R17 at the rear. Serious rubber!!!!
November 2006
While waiting for the rim supplier to eventually give me the specs on offsets and on the price of shipping to Cape Town, I proceeded with the final body fitments, including th
 e new windscreen. We added the bonnet locks and the gas struts and the boot lock and its hook in the boot itself. In final preparation of the body sanding down, I refitted the sidepipes, which meant having to re-fit the headers temporarily again. I have also cut the holes in the dash for the instruments, this after many mockups on PowerPoint, which was very useful for laying everything out to scale and being able to print a colour copy which I stuck into the car. This way you get to see everything exactly where and how it will look when complete. At least it is really looking like a real car now!
December 2006

A really frustrating month as I wait for the tyres and rims to be delivered. These finally arrived and on seeing them, all frustration disappeared! They are awesome to say the least. I had the tyres fitted to the rims and could not wait to try them on the car, only to be disappointed that the rim supplier had sent metric mounting pins for the spinner adapters for the 1/2" UNF studs on the Jag hubs, and they were now closed for Christmas. So now I must wait for mid Jan to get on with the next step - shaping the body to cater for the monster rear 315's! I received the petrol cap and positioned it where it is supposed to go, but have decided to turn it around so that a filler hose is not obstructed by the flipped up cap. This necessitates raising it slightly to miss the body when open. Nothing more will get done before mid Jan, so have a great Christmas and let's hope I get some parts from the family!
January 2007
I did receive a great hardcover coffee table book on the Cobra history from the family - no parts, but great reading! Also eventually got the right wheel studs from the rim supplier and eagerly fitted the rear wheels and then tried the front which don't fit! More frustration. The supplier cannot understand this, yet when I asked other folk fitting them, they all have to modify the hubs! So I decided to ask Jean Fourie to assist again, and loaded up the car on a flat bed and took it off to Tokai.
That was all for JanuaryFebruary 2007
 The car was now rubbed down and all the impefections (many) in the body shell were heated up, popped and filled before being rubbed down. Jean also created spacers for the front hubs so that the adapters fit without having to be pressed on and potentially never coming off. He also modified the side pipes to improve their overall height, as these were hanging too low, and would catch on the slightest speedbump. The large Cobra air filter was modified and lowered so that it does not touch on the bonnet.
March 2007
The prep work took longer than expected, but all was eventually completed, along with the adjustments to the angle of the shocks, boot and bonnet rubbers, petrol cap spacer and front wheel arches.April 2007
I collected the car and brought it back to my garage. It is amazing how much you miss it when it's not there! I would have taken it straight for spraying, but I felt I must complete all the drilling bits while it was unpainted. (Truth is I didn't have enough cash!) I ordered the two roll bars which will fit straight up (ie vertically vs angled) and into the boot, as against to them behind the seats. I also ordered the anti roll and sway bars which only come available when someone wrecks an Izuzu bakkie! Now you know why there is no more cash this month.
May and June 2007
May saw me collecting the rollbars and creating the bracket inside the boot to accommodate them. This entailed drilling big holes through the body which took a while to pluck up the courage to do, even though I could still have repaired a mistake in the unpainted body. All went well except that I discovered that the boot is actually off centre, so the bars, which will follow the centre line and stripes, are also slightly off centre. I hope nobody comes to view the car with a tape measure! I also got the stainless steel plates for my dash which will hold all the warning lights and the radio and switches. These were sent off for polishing with the roll bars. In June, we finally managed to find two sway bars and started to fit them, which due to the adjustments on my rear shocks, was slightly different to the way Shamrock fitted them. Eli constructed templates of special mounting brackets and took them off for fabricating at home.
July 2007
We concluded the sway bar fitting with the brackets being TIG welded onto the chassis and the new brackets fitted to the rear hubs. I also completed the dash plates which were polished last month. I mounted all the warning lights, switches and the starter button. The dash is now ready for upholstery. The handbrake bracket which I constructed last month was plated and is now mounted, on the passenger side of the tunnel. This allows a small space to rest your arm without being poked by the lever. Jean's team returned to touch up some small issues with the body preparation and it is now ready for painting. I had some quotes for this task and must admit to being surprised at the high costs, but then again, I want it to look good so I had to go to the best painters. The diff was filled with lube and a small bracket to hold the fuel line at the rear was fitted.
August 2007
Nothing happened this month other than the very exciting event of taking the car for spray painting. A little dissapointing when they advised that the car still needed quite a bit of rubbing down, and that it would take almost two months to complete. It looks like this car will never get on the road!
September 2007
I was on leave in the UK and watched the Boks play (or was that THUMP?) England in the World Cup, oh, and forced to visit a few UK parts suppliers. I went to Merlin to buy seat belts, exterior mirrors, and a radiator cap, and visited Mota Lita and bought a steering wheel. In my last week I caught a train out to Harlow to visit DJ Sportscars, commonly known as Dax, and spent some time watching them fabricate their Cobra lookalike. Furtunately for my wallet and my suitcase weight, they didn't have any parts I could use.
October 2007

After a slow start while I was away, the spray painters continued to prep the body for spraying by rubbing down the car again, and then applying the first coat of primer. This highlighted all the imperfections which were filled (see right) and sanded down yet again (see below). This was then sprayed again with undercoat before being finally rubbed down. Slow process, but very important if it is to look good later on. They also produced a sample of th
 e paint colour on an off-cut piece of metal, which meant I could confirm the colour and the type of white before actually spraying the car itself.
November 2007

After lots of frustration of trying to line up the stripes around the various odd shapped and misaligned body, spraying took place on Friday 9th. Two undercoats, two blue and two clear. Great excitement. It now stood for a week before polishin
 g.
g.I then hired the trailer again and moved it over to the upholsterer (Peter Crowley) to do the leather dash, seats, carpets, boot and door panels. This took about two weeks, and as they are located in town, I could pop in most days to check out progress, which was fast . They did a great job .


Once complete, I hired another trailer to bring it home. This was not very successful as the trailer was too short, or more importantly, the nose could not fit over the trailer frame and hence I had to abandon the move - very disappointing! Two days later I managed to hire the original trailer and we were home safe.
December 2007
After fitting the lights back on the car, the auto electrician arrived and started to fit the loom. I am really glad he had done this before as there are so many wires, I just don't know where they all go!
After a few days the wiring was completed in the car and the dash was also done. It was now time to start re-fitting everything into the holes that were either filled in or made much smaller. Not fun drilling and filing out holes in newly painted body work.

The car was now starting to look like my inspiration photo right at the top of this blog. I bought the battery, hooters and lots of stainless steel bolts and nuts for refitting all removed parts.
On Thursday the 20th, the hooter blasted, lights lit up, indicators flashed, gauges lit up, the clock ticked, the fans blew air, and the engine could be turned - MASSIVE excitement! Next was a fruitful Saturday refitting the headers, exhausts, carb, various senders and we connected the plugs and electronic ignition in the distributor. On the last day of 2007, Eli and I worked, but unfortunately we did not get around to starting the car. We did however connect the gear lever cable to the gearbox, greased all the bearings, and then started to bleed the brakes, only to discover the master cylinder for the rear brakes has seized! So that had to come off with brake fluid going everywhere, but mostly in a controlled fashion. We then fitted the rear 315's, did the speedo sender bracket to pick up the revolutions from the propshaft bolts, and ended the day (year!) by fitting the fuel tank sender. Starting would now have to wait for some time in 2008.
January 2008
On my last day of leave, the master cylinder arrived back, only for us to discover that for some reason they had sandblasted all the coating off it and not re-coated it! I could have painted it, but we still would not have been able to fit it, so back it went for coating. This of course meant that we could not bleed the brakes, nor re-fit the front wheels, and naturally not start the beast! We did get to fitting the filler cap and linking pipes, replacing the windscreen, and fitted the Moto-Lita steering wheel and rear view mirror. I also plucked up the courage to drill the holes for the badges, so now I know it is a 350 Shamrock Cobra! The master cylinder was returned and refitted, and although much better, was still not right. It was strong enough to allow us to bleed the brakes and prepare for the FIRST START! Tuesday 22nd Jan 2008, Jean, Eli, Yusuf and I filled the fuel tank, the radiator and the gearbox with the necessary fluids. To our relief, nothing poured out the bottom! We then jacked up the rear, checked oil pressure with the coil disconnected, and then at 6:38pm, we turned the key for the first start. It kicked into life almost immediately!
We then proceded to prime the gearbox and unfortunately discovered a serious gearbox leak out of a hole on the side of the box. Furtunately this is just a pressure testing vent which should have a plug in it, so after sourcing and fitting the plug a few days later, I could fill the gearbox and prime the box. Dave Geddes then popped over and we set the carb - and took it out onto the road for its first drive - awesome feeling!
February 2008The seats were bolted down and I temporarilly fitted the seat belts. They were temporary as they are 4 point harnesses and although I used the main lower mounting points into the chassis, the position of the top ones was only to be decided on later. Jean helped me adjust the shocks up a bit, but they could go some more. The roll bar cover plates were laser cut and had studs welded on their undersides ready for polishing and mounting.
The next big event was taking the car to Stikland for clearance and registering. The process is laborious, but has to be done in sequence. If anyone has to go through this, give me a call! The first phase is the Police checking that the car is "built up" and that the engine is not stolen. You then get a chassis number which is then stamped (smashed?) onto the chassis, followed by going back to the Police for stamping of another number on the chassis. Then a weight certificate, which all gets handed in at the municipality who send it away for a VIN number. Fortunately eNatis was working for once, and within 3 days I received a call to collect my papers. This I did in the following week, along with another temporary licence.

March 2008
On the Saturday of that week, I took the car to Table View AVTS and flew through the roadworthy. Now that I had a roadworthy, I got a 21 day temporary licence which meant I could go on my first breakfast run on the Sunday, which was a drive over Ou Kaapse Weg, Chappies, Hout Bay, Constantia Nek, and back home - awesome feeling! Then on the Tuesday I went back to Stikland, where they checked the number on the RPC but advised me the computers were off-line and I would have to come back again the next day! Just when I was so close, and I had thought the two steps forward, one backwards routine, was behind me! But the next day I eventually got my documents and did the registration bit at the traffic department, so now she was totally legal! COBRA08-WP lives!
Since April 2008
Once I started driving her around, I soon had to have the wheel allignment done, dyno tuning and final touch-up to the paintwork. I also had a softtop fitted and then a Tourneau cover using the same Tenax fasteners on the body.
Thats all for construction! It is now just great fun driving it.
Hope you enjoyed reading my story.
Peter Versfeld
==============================================================
Counter (Since January 2008)
![]()